9.5 Creating a Change Order
Any type of purchase order other than an original blanket order (of any type or processing condition) can be changed.
- Click on Documents tab to open the document search screen.
- Enter search criteria to find the order that you wish to change. (See Document Search)
- Click on the Purchase Order number to open the Purchase Order Status Summary screen.
- At the top of the purchase order status summary page click on the change PO button to open the Purchase Order Change screen.
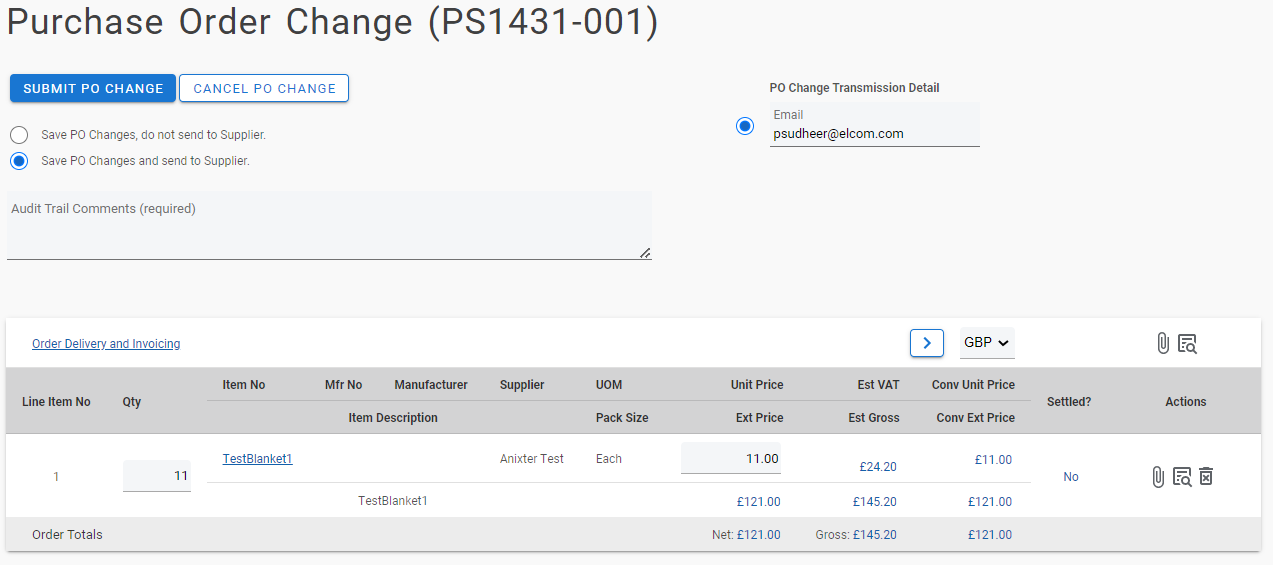
- The Change PO button brings you to the Purchase Order Change screen where changes to the most recent Purchase Order can be made. You have the ability to perform changes or additions to the following fields in the purchase order:
- Quantity: Click in the Qty field and overtype the quantity. The quantity cannot be reduced to a value less than the quantity already received or settled.
- Unit Price: Click in the Unit Price field and overtype the original price.
- The price cannot be changed for items that have been ‘Fully’ settled.
- The price can be changed if the settlement type is ‘Amount’ and the settled status is ‘Partial’.
- Non-Catalogue Items: Click on the item number to enter the update non-catalogue item screen.
- Attachments: Click on the Paper clip icon to update comments and attachments.
- Financial Tracking and Tax: Click on the financial tracking icon to update financial tracking codes and tax treatment for an item. Financial tracking code access permissions will be based on those of the original requisitioner / buy-for user even if the user undertaking the change has different permissions.
- Budget Detail: Click on the budget icon, if available, to open the Order or Line level Budget Detail screen. These screens are non editable and provide summary budget information only.
- Order Delivery and Invoicing: The Order Delivery and Invoicing page includes editable fields for Payment Terms, FOB Terms, and Freight Terms.
- New Catalogue Item: Click search in the top menu bar to add a new catalogue item. PECOS will open the search page in PO change mode and restrict access to the change order supplier’s catalogue only.
- New Non-Catalogue Item: Click on the add non-catalogue item button to add a new item.
- Choose a PO Change Order transmission option
- Save PO Changes and send to Supplier. If you have made changes that impact what the supplier delivers or reflects changes that need to be communicated to the supplier (such as new items or pricing) the PO Change should be retransmitted to the supplier.
- Save PO Changes, do not send to Supplier. If you have made changes that do not impact what the supplier delivers (such as updating already delivered items or amending financial tracking information) the PO Change may not need to be communicated to the supplier.
Select the appropriate radio button at the top of the Purchase Order Change screen.
- Optionally complete PO Change Transmission
Depending on the supplier’s set-up, you may have the option to change the eMail or fax address to where the Purchase Order Change is transmitted. This will override the supplier’s normal order transmission method and is not dependant upon the method of transmission of the original order. It is not possible however to select XML as a transmission method unless the original order was transmitted in the same way: an XML option will therefore only appear if the original order was transmitted by XML. Choose the appropriate option and complete the eMail or fax details:
- Enter an audit trail comment in the text box provided, giving your reasons for the Order Change. Audit trail comments are mandatory.
If an audit trail comment is omitted when the change is submitted, a warning message will be displayed.
- Submit Changes
To submit your changes click the submit PO change button at the top of the screen. A Purchase Order Change Review screen will open.
To cancel your changes click on the cancel PO change button. You will return to the Purchase Order Status Summary screen without committing any changes.
- Review your changes in the Purchase Order Change Review screen.
Notice that the system automatically populates the ‘PO Change External Comments’ text box with line level change details. This text will appear on the change order as a change order comment below any existing external order level comment.
If you are happy with your changes, click the submit button to create a Change Order. The updated Purchase Order Status Summary screen will open.
To return without saving changes and not create a change order, click the back button.
A version number is added to the end of the Purchase Order number to distinguish it from the original order. The original order is superseded and becomes read-only.
Order Numbering
The change order numbering convention is: PO # - Blanket Release # - Change Order #
If the original order is a release to a blanket order, the middle sequence will be completed; if the original order is not a blanket release, the middle sequence will be 000. For example:
Purchase Order 121 = 121
Change Order #1 of Order 121 = 121-000-001
Change Order #2 of Order 121 = 121-000-002
Change Order #1 to first blanket release of Order number 124 = 124-001-001
Change Order #4 to third blanket release of Order number 124 = 124-003-004