13.1 Catalogue Format and Transmission
The PECOS P2P catalogue is a simple MS Excel © spreadsheet. The current template is available from Customer Elcom Support upon request and will be provided with guidance and completion notes.
When completed, the catalogue template must be saved as a .csv file with any header rows removed. Catalogues can be loaded to PECOS P2P by sending them via eMail or posting direct to the Service Desk. Further information can be found in the PECOS P2P Catalogue Load manual.
Elcom do not under any circumstances change or manage the catalogue data.
Alternatively content can be managed and loaded directly via the PECOS P2P Catalogue Content module: see PECOS P2P Catalogue Manager User Guide.
Special Characters
PECOS allows special characters to be entered via the catalogue load and through Item Maintenance fields. These characters, often entered via cut and paste, especially when entered into Item Number and Description fields, can cause issues with order transmission and indexing processes.
Although special characters are allowed to be entered through the Loadcat program and via the UI, they will be cleansed when parsed or propagated into the database. Special characters present in a catalogue load will not result in an upload failure but will be removed during the upload process and special characters entered through the UI will not be stored despite being saved.
The following list of non printable characters are included, but are not limited to, those that are removed:
ASCII code 00 = NULL (Null character)
ASCII code 01 = SOH (Start of Header)
ASCII code 02 = STX (Start of Text)
ASCII code 03 = ETX (End of Text, hearts card suit)
ASCII code 04 = EOT (End of Transmission, diamonds card suit)
ASCII code 05 = ENQ (Enquiry, clubs card suit)
ASCII code 06 = ACK (Acknowledgement, spade card suit)
ASCII code 07 = BEL (Bell)
ASCII code 08 = BS (Backspace)
ASCII code 09 = HT (Horizontal Tab)
ASCII code 10 = LF (Line feed)
ASCII code 11 = VT (Vertical Tab, male symbol, symbol for Mars)
ASCII code 12 = FF (Form feed, female symbol, symbol for Venus)
ASCII code 13 = CR (Carriage return)
ASCII code 14 = SO (Shift Out)
ASCII code 15 = SI (Shift In)
ASCII code 16 = DLE (Data link escape)
ASCII code 17 = DC1 (Device control 1)
ASCII code 18 = DC2 (Device control 2)
ASCII code 19 = DC3 (Device control 3)
ASCII code 20 = DC4 (Device control 4)
ASCII code 21 = NAK (NAK Negative-acknowledge)
ASCII code 22 = SYN (Synchronous idle)
ASCII code 23 = ETB (End of trans. block)
ASCII code 24 = CAN (Cancel)
ASCII code 25 = EM (End of medium)
ASCII code 26 = SUB (Substitute)
ASCII code 27 = ESC (Escape)
ASCII code 28 = FS (File separator)
ASCII code 29 = GS (Group separator)
ASCII code 30 = RS (Record separator)
ASCII code 31 = US (Unit separator)
ASCII code 127 = DEL (Delete)
Submit to Service Desk
Catalogues should be submitted directly to the Elcom Service Desk by a system administrator with the appropriate access permissions. Connect to the Service Desk at http://servicedesk.elcom.com and login using your credentials. Select ‘Catalogues’ > ‘Upload Catalogue’ and then select which system the catalogue is to be loaded (Test or Production). Please refer to the latest Customer Support and Service Desk Guides for additional information.
Submit by eMail
When submitting a catalogue to the Service Desk is not practicable, catalogues can be submitted by eMail. To eMail catalogues for upload, send to ipm_catalogs@elcom.com. The eMail should ideally contain a single catalogue and must contain the following information:
- The catalogue, attached as a .csv file.
- The Catalogue Key
- The type of load: Upload or Reload
- Load Location (PECOS Test or Production URL)
eMail confirmation will be sent by Elcom Support after the successful loading of a catalogue, detailing the number of items loaded and number of failed items with a brief description of the reason for failure. (Note that a full or detailed reason for load failures may not always be available.) Any catalogues that do not meet the correct load criteria will be returned.
Electronic Catalogue Load Setup
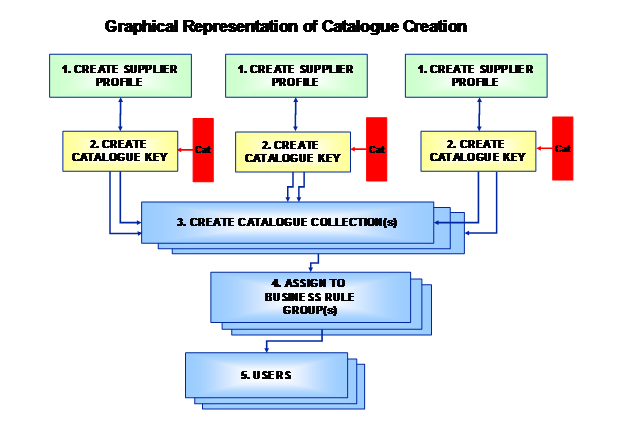
The following steps should be followed in order to load an electronic catalogue provided by a supplier or created in-house. Each step is covered in detail later in this section.
- Create a Supplier Profile (see Suppliers).
- Optionally use Category Maintenance to update or create categories that are to be used in the Catalogue (see Maintain Categories).
- Optionally create a Catalogue Collection into which your catalogue is to be placed (A collection may already exist) and add it to appropriate Business Rule Groups (see Catalogue Collections).
- Create a Catalogue Key and assign it to the Supplier Profile. Place the Catalogue Key in an appropriate Catalogue Collection(s) (see Catalogue Key).
- Submit the Supplier Catalogue to Elcom’s Catalogue Management team (see Catalogue Format and Transmission).
- Finally, check that the Collection(s) into which the catalogue belongs are correctly assigned to Business Rule Groups and the Business Rule Groups are correctly assigned to all users who require access to the catalogue.
Manual Catalogue Creation Setup
The following steps should be followed in order to manually create a catalogue using Item Maintenance.
- Create a Supplier Profile.
- Optionally use Category Maintenance to update or create categories that are to be used in the catalogue items (see Maintain Categories).
- Optionally create a Catalogue Collection into which your catalogue is to be placed (A Collection may already exist) and add it to appropriate Business Rule Groups (see Catalogue Collections).
- Create a Catalogue Key and assign it to the Supplier Profile. Place the Catalogue Key in an appropriate Catalogue Collection(s) (see Catalogue Key).
- Contact Elcom’s Customer Elcom Support and ask for an Index to be created for the Catalogue. Wait for confirmation that this task has been completed.
- Add the items manually to your catalogue in Item Maintenance (see Catalogue Items).
- Finally, check that the Collection(s) into which the catalogue belongs are correctly assigned to Business Rule Groups and the Business Rule Groups are correctly assigned to all users who require access to the new catalogue.