18.4.1 Create a New Plan
Last modified by Admin User on 2023/06/30 10:26
- Select the Approval Rules > Approval Plans tab to open the Approval Plan screen.
- At the Plan Type dropdown list click one option:
- Requisition Approval: The plan will route requisition documents only for approval.
- Purchase Order Approval: The plan will route Purchase Order documents only for approval.
- Change Order Approval: The plan will route Change Order documents only.
- Receipt Approval: The plan will route Receipt records only.
- Invoice Settlement Approval: The plan will route Invoice documents only.
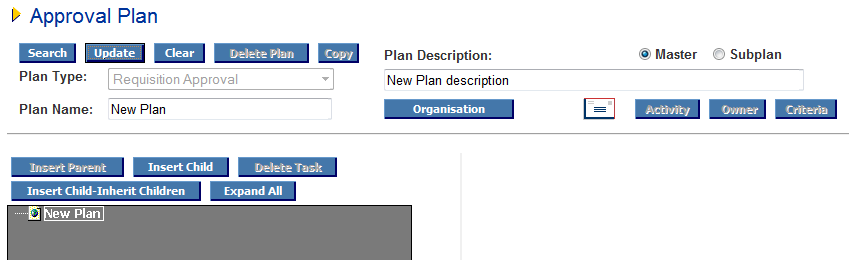
- Click New. ‘New Plan’ will appear by default in the description and name fields.
- Enter a Plan Name (max 48 characters). This should be the short name for your plan and will appear at the top of your task list. The plan name is viewed when you search for a plan.
- Enter a Plan Description (max 256 characters – default is ‘New Plan description’). This is the long name of your plan and can contain greater detail. The plan description is viewed when you search for a plan.
- Select either the Master or Subplan plan radio button (default is Master Plan).
- Click the Organisation button and using the organisation explorer tree, designate the organisation to which this plan will be assigned for administration purposes. Click the update button after selection.
Note that this organisation selection is optional: if none is selected the plan will be saved to your default administration organisation. - Click Update. A confirmation screen will display: click OK to establish your new Approval Plan.
- You are now ready to build the tasks for the new plan. Click Insert Child to add your first task: ‘New Task’ will appear in the task tree and task name field. Follow the steps for Activity, Owner and Criteria below.