12.7 Prior Receipts
12.7 Prior Receipts
If permission is granted through your user profile, receipt editing will be permitted through the Receipt Detail screen in the Edit Receipt screen. There are certain conditions under which editing is not permitted (see Editing Permissions).
12.7.1 Prior Receipts / Returns
There are two ways to access the Prior Receipts / Returns screen.
- Click on the Documents tab to open the document search page.
- Enter search criteria to find the purchase order for the receipt you wish to update (see Document Search). Note that the Document Search (Find by ID) allows you to search for a document using a Delivery Note Number.
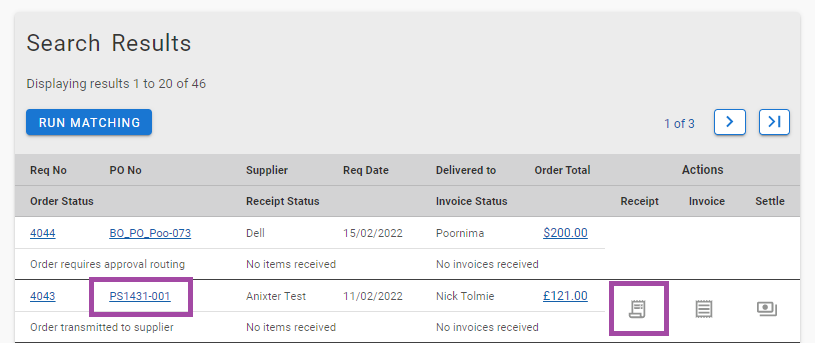
In search results screen, click on either:
- The Receipt icon in the Actions column to open the Receipt Entry screen; or
- The PO Number to open the Purchase Order Status Summary screen.

In either the Purchase Order Status Summary or Receipt Entry screen, click on the Prior Receipt / Returns button to open the Prior Receipts and Returns screen.
Prior receipts and returns are displayed in descending date order, with the most recent of each transaction type expanded by default.
To expand or collapse any details click the collapse/expand icon to the right of each transaction header.
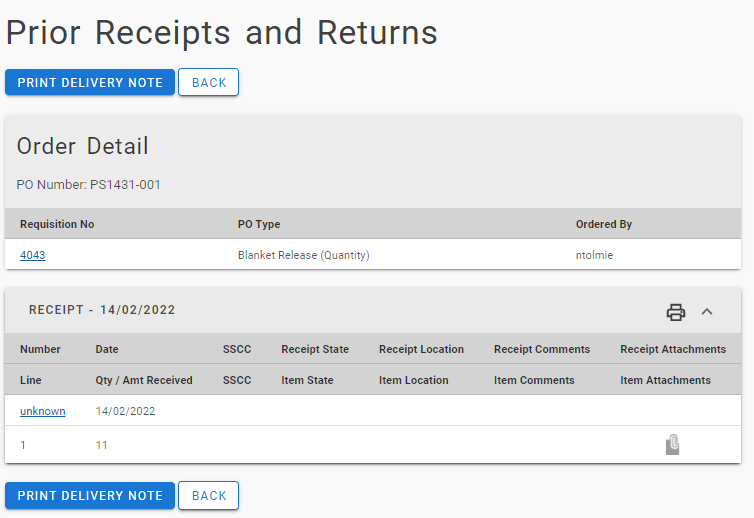
A number of actions can be undertaken from the Prior Receipts and Returns screen:
- Print a Delivery Note: click the Print Delivery Note button to generate and display a Delivery Note for printing.
- Print Receipt: click the printer icon to the right of each transaction header to generate and display a Receipt Print.
- Receipt Detail: click the receipt number to open the Receipt Detail screen where the receipt can also be edited. (see below).
12.7.2 Receipt Detail
In the Prior Receipts and Returns screen (see above), click on a Receipt Number to open the Receipt Detail screen.
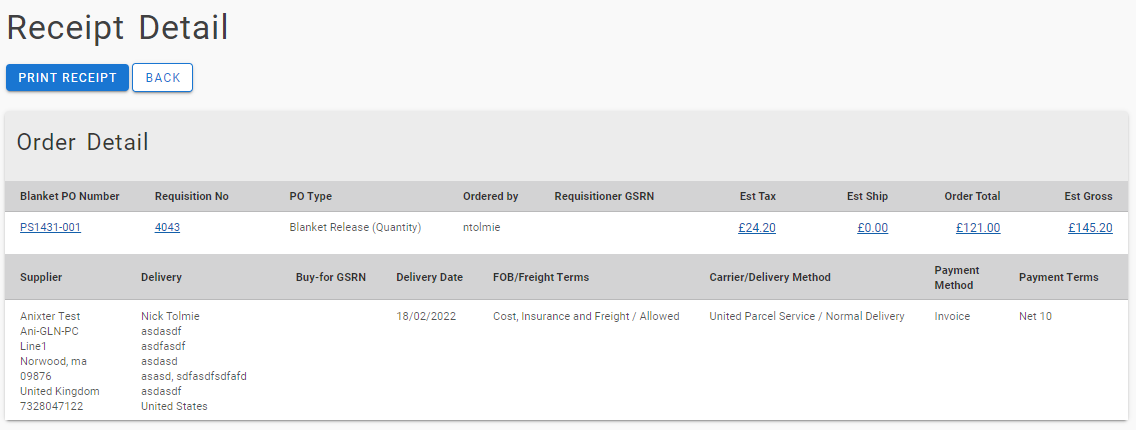
The Receipt Detail screen displays a summary view of the receipt and provides access to receipt editing and allows you to print a copy of the receipt:
- Print Receipt: Click the Print Receipt button to generate and display a Receipt Print.
- Edit Receipt: Click the Edit button to open the Edit Receipt screen. (Note. There are a number of reasons why the Edit button might not display: please refer to 'Editing Permissions' later in this section).
12.7.3 Edit Receipt
If permission is granted through your user profile, receipt editing will be permitted through the Receipt Detail screen. There are certain conditions under which editing is not permitted (see Editing Permissions below).
1. Clicking the Edit button in the Receipt Detail screen (see above) will open the Edit Receipt screen where receipt details can be updated.
Search and Filter
The Receipt Detail table displays a Quick filter to provide a 'type ahead' text search, which automatically filters the entries in the table using the string of characters entered.
You may also use certain column headings to sort the list of receipts. Click on the heading that you wish to sort by and PECOS P2P will sort the table either alphabetically or numerically in descending or ascending order. Click again to reverse the sort order.
- Click 'Line Item No' to sort rows by line number. (This will also allow the sorting to be reset to the default view.)
- Click 'Item No' to sort rows by item number.
- Click 'Mfr No' to sort rows by manufacturer's part number.
- Click 'Manufacturer' to sort rows by manufacturer's name.
- Click 'Item Description' to sort rows by item description.
2. Supplier and Delivery header information and Comments are displayed collapsed. Click the collapse/expand arrow to the right of the section header to expand and view this detail
3. The following previously entered receipt details are editable:
- Delivery Note Number: Simply overtype the delivery note number. The field remains mandatory under editing and if the Delivery Note Number is removed or deleted during editing, the default value of 'unknown' will be inserted. To ensure erroneous omissions are avoided, a click through warning for the empty field will be presented.
- Date Received: Click the calendar icon and select a new date. The date must be the current date or a date prior to the current date.
- Receipt State: Select an alternate State at header or line level from the list box.
- Receipt Location: Select an alternate Location at header or line level from the list box.
- Quantity/Amount Received: Overtype an updated quantity or amount.
To remove all quantities received from all lines on the receipt click on the 'Unreceive All' button. The Qty/Amt Received will automatically be removed for all lines. - Comments and Attachments: Click on the attachment icon (paper clip) to open the comments and attachment screen: Update comments by retyping and clicking ‘Save’; To delete an attachment click the X delete icon. When an attachment is deleted a confirmation click through message will appear. When editing tasks are complete click the ‘Back’ button to save and return to the Edit Receipt screen.
4. Ad hoc lines are displayed at the bottom of the Line Detail section, separately numbered and highlighted for clarity. It is possible to add, edit or delete an additional Ad hoc line by clicking the appropriate Action icon:
- Click the Edit icon to display the Ad hoc line in 'Insert' mode. Update line details and click the 'Update Ad hoc line' button. Clicking the 'Clear Ad hoc Line' button will clear the Ad hoc fields but will not delete the line.
- Click the Delete icon to delete the Ad hoc line.
- Click the 'Show Ad hoc line' button to enable Ad hoc insert. Enter line details and click the 'Insert Ad hoc line' button. The new line will not be saved until the Update Receipt' button is selected.
5. When all tasks are complete click the Update Receipt button.
6. The Receipt Detail screen will redisplay with a confirmation message that the receipt has been updated.
7. Click Back to return to the Prior Receipts and Returns screen.
The receipt status will refresh and possibly change based on the edited receipt quantity. The audit trail will also be updated with all receipt editing activity.
Editing Permissions
A receipt can be edited for an open order unless the following conditions are present:
- The user does not have Edit Receipts permission granted in their user profile.
- The supplier is an Evaluated Receipts Settlement supplier.
- The ReceiptReturn Export has been run.
- The order is Manually Closed.
- The receipt is currently routed in the Receipt Approval workflow process.
- The receipt has been imported using a batch import utility.