12.4 Processing Receipts
This section explains all the steps involved in receipting items.
12.4.1 Search and Find PO
- Click on the Documents tab to open the document search page.
- Enter search criteria to find the purchase order you wish to receive (see Document Search).
- The Receipts screen can be accessed in one of two ways:
- In the search results, click on the Receipt icon in the Actions column.
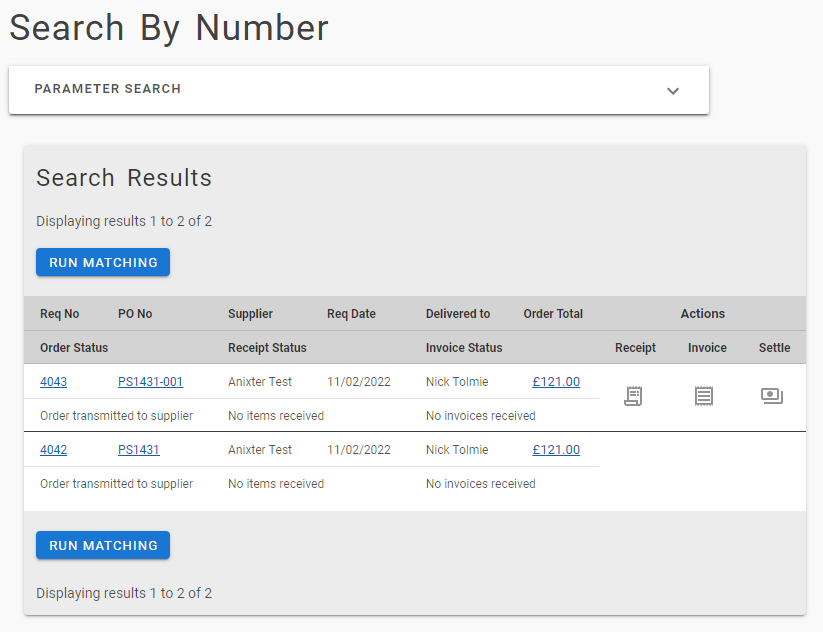
Or
- Click on the PO Number to open the Purchase Order Status Summary screen. Next click the ‘Receipt’ button at the top of the page.
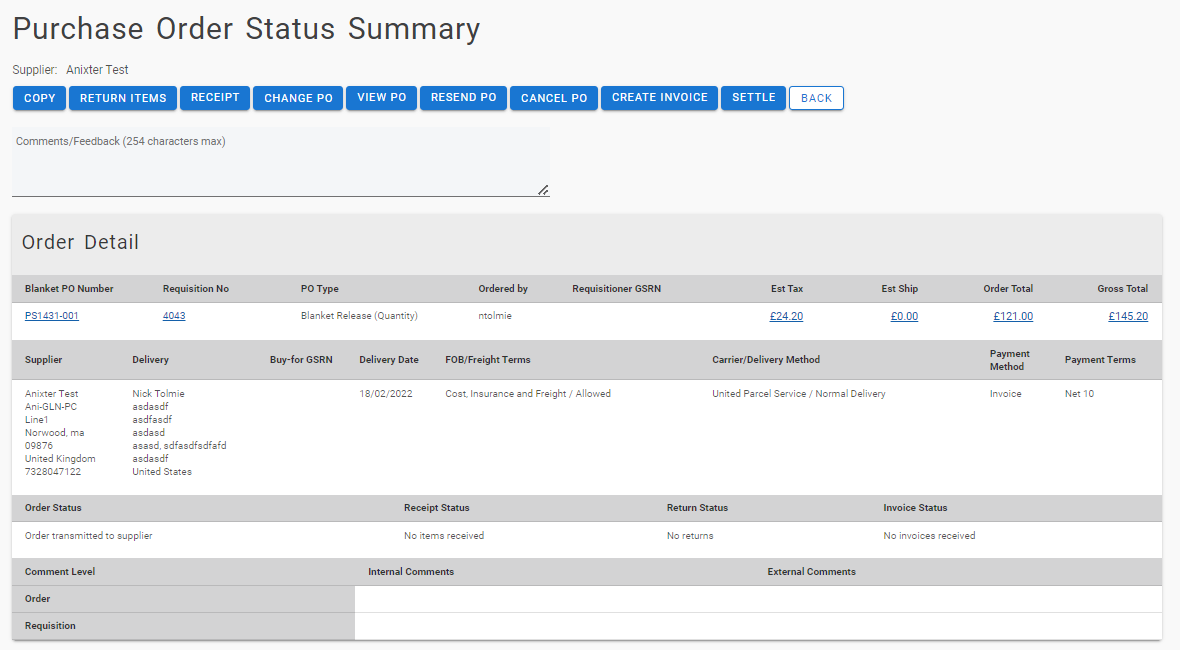
The Receipt Entry page will open for the order that was selected. The receipt form contains all the information that was on the original order to prevent you having to re-type any order information. Review the order details to confirm that you have selected the correct order.
12.4.2 Receipt Entry
Receipt Header
A PO context block is found at the top of the page, containing: Order Number, Requisition Number, PO Type and Ordered by (requisitioner).
Supplier and Delivery Info is displayed in a collapsible section, containing: Supplier Name, Delivery Address, Internal Address (place holder for future development), Delivery Date and Delivery Method. The section is collapsed by default and may be expanded by clicking on the expand arrow to the right of the header row.
A Comments section will display if there is at least one requisition or order level comment. This area is also presented in a collapsible section and is collapsed by default.
Receipt Detail
Search and Filter
The Receipt Detail table displays a Quick filter to provide a 'type ahead' text search, which automatically filters the entries in the table using the string of characters entered.
You may also use certain column headings to sort the list of receipts. Click on the heading that you wish to sort by and PECOS P2P will sort the table either alphabetically or numerically in descending or ascending order. Click again to reverse the sort order.
- Click 'Line Item No' to sort rows by line number. (This will also allow the sorting to be reset to the default view.)
- Click 'Item No' to sort rows by item number.
- Click 'Mfr No' to sort rows by manufacturer's part number.
- Click 'Manufacturer' to sort rows by manufacturer's name.
- Click 'Item Description' to sort rows by item description.
In the Receipt Detail section you must enter three pieces of key information: GRN, Date and Quantity Received.
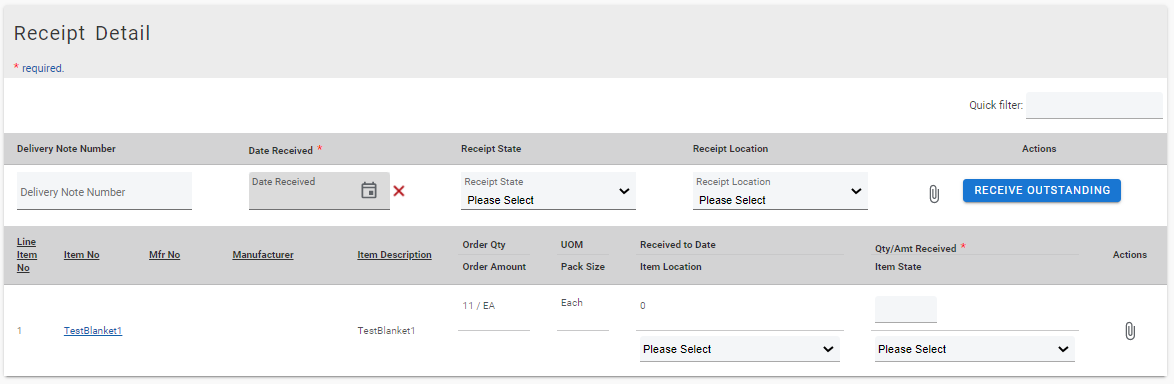
1) Delivery Note Number (Goods Receipt Note or Packing Slip reference number)
- This field is alpha-numeric and the maximum field length is 15.
- Entry of a Delivery Note Number is not mandatory. However if no number is received and the field is left blank, 'unknown' will automatically be inserted. Before the record is saved, to ensure erroneous omissions are avoided, a click through warning message will appear to warn that the Delivery Note number is missing. Click 'OK' to continue (i.e. retain the value 'unknown') or 'Cancel' to return to enter the correct value.
Note. A Receipt State 'No Delivery Note' is available for optional selection if no details are received. - The number entered must be unique for each purchase order: i.e. each receipting action must have a different reference.
Note that system assigned 'unknown' references are non-unique.
2) Date Received (Mandatory)
 Click on the date picker to open the calendar window.
When the Calendar opens it can be incremented and decremented by month and year by clicking on the arrows in the header bar. To select a date, click on it. The calendar will close and the date selected will populate the Date Received field.
 The forward arrow symbol will move the month forwards
 The backward arrow symbol will move the month backward
 The forward circled arrow symbol will move the year forwards
 The backward circled arrow symbol will move the year backwards
Click on the date required to select it. The date will automatically populate the Date field. Use the red delete icon to clear the date if you wish to make a change.- The entry of a receipt date is mandatory.
- The receipt date will be validated and future dates are not allowed. Enter a date that is either current (i.e. today) or past.
3) Quantity/Amount Received (Mandatory)
- Enter the actual quantity of items that have been delivered.
Note. These values may be matched against the supplier invoice during the settlement and payment process as part of the authority to pay. - The quantity can be a decimal of up to six decimal places. (Decimal numbering must be enabled for your organisation.)
- A quantity or amount of zero (0) is allowed.
Note. If an item is missing from a consignment but is shown as delivered on the supplier delivery documents, it is possible to register the missing item for action and review during Receipt Workflow. - The quantity entered is not validated and may be greater or less than the quantity ordered. However, if receipt tolerances are enabled, over receipting may not be allowed (see Over Receiving).
- It is possible to automatically allocate a receipt quantity by clicking the Receive Outstanding button. PECOS P2P will populate the quantity box for every line on the order with a quantity equal to the receipt balance remaining for the line. The receipt quantity is calculated as: Order Quantity less Received to Date.
Tip. Use the ‘Receive All’ button when you have a few items on a large order that have not been received. Click ‘Receive All’ and then change the non-receipted lines as an exception: remember all quantities are editable until you click the Save New Receipt button.
12.4.3 Receipt State
You may enter an optional Receipt State at header level (to represent a delivery condition) or line level (to represent a single item condition).
- Click on the drop down boxes to select one that is relevant. The State selected at header level and those selected for each line may all be different.
- The Receipt States are used by the Receipt Workflow to determine a route for review or a course of corrective action.
States may also be used to run performance and statistical reports for suppliers. Therefore, for example, if goods are missing, damaged, incomplete or substituted it is important to select an appropriate State.
Note. Bespoke or specific States may be added by your System Administrator that are relevant for your organisation. - States are saved in the prior receipt history and the header level State appears in the order audit trail.
12.4.4 Receipt Location
You may enter an optional Receipt Location at header level (to represent a place of delivery) or line level (to represent a single item location).
- Click on the drop down boxes to select one that is relevant. The Location selected at header level and those selected for each line may all be different.
- The Receipt Locations are used by the Receipt Workflow to determine a route for review or a course of action.
Therefore, for example, if goods are destined for an onward stage of delivery or are booked in to a specific place for collection it is important to select the correct Location.
Note. Bespoke or specific Locations may be added by your System Administrator that are relevant for your organisation. - Locations are saved in the prior receipt history and the header level Location appears in the order audit trail.
12.4.5 Comments and Attachments
You may enter optional Comments and Attachments at the header or line level.
Click on the attachment icon (paper clip) to open the comments and attachment screen.
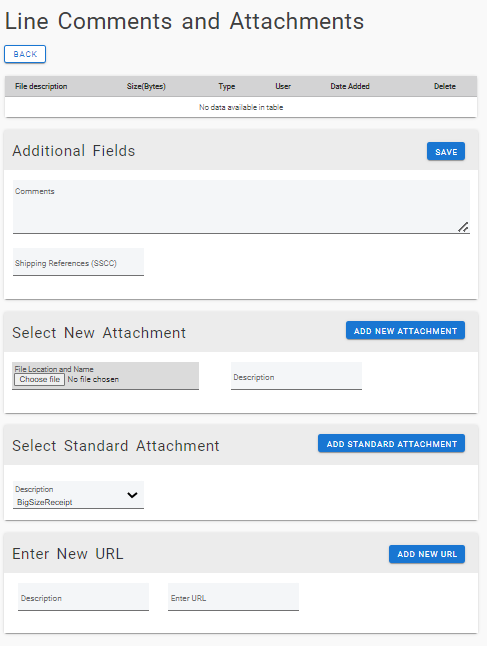
- Comments: Type your free text comments into the Comments box and when finished click the ‘Save’ button
- Shipping References (SSCC): If there are any additional shipping or container references you wish to record, they can be entered here.
- Select New Attachment: Click the browse button to locate and select the document that you wish to attach to the receipt record. Enter a Description for the document and then click the ‘Add New Attachment’ button.
- Select Standard Attachment: Select one of the preloaded documents from the list box. Click the ‘Add Standard Attachment’ button to save the attachment.
All attachments are saved as ‘internal’ attachments and will be available to view in the in the prior receipts history. - Enter URL: To attach a web address where an attachment is held externally, type the details into the ‘Enter URL’ field and enter a description.
- There is no need to enter http:// as this will display at the start of the field automatically.
- The field will validate for URL characteristics (e.g. illegal characters, spaces and a valid extension)
- The length of the URL has a maximum of 250 characters.
Click the ‘Add New URL’ button to save the entered URL. Any attachments defined by a URL will be saved externally and not download or saved in PECOS at any point.
- Attachment Details table: All attachments will appear in the attachment detail table at the top of the screen.

If you wish to delete an attachment at any time click the X delete icon. When an attachment is deleted a confirmation click through message will appear. Click the ‘OK’ button to close the warning and continue with the deletion. Click the ‘Cancel’ button to close the warning and return without deleting.
When all comments and attachments have been entered, click the Back button at the top of the page. Comments and attachments will save and you will be returned to the Receive Items page. The attachment icon will change to indicate that a comment or attachment exists (i.e. a piece of paper will appear).
12.4.6 Ad hoc Line Entry
The Receipt Detail section of the Receipt Entry screen allows the entry of Ad hoc lines when goods or services are received that are not on the original purchase order (e.g. item substitutes) or cannot be properly identified by warehouse personnel.
Ad hoc lines should be considered temporary and used as simple notification lines (albeit structured), used to notify and prompt the recipient of a workflow task to undertake manual corrective action. For example, errors and substitutions, which could otherwise lead to invoice matching discrepancies, are able to be resolved in a timely manner through a return or change order process. They should be looked upon as extended comments fields and will have simple usage: with lines added at point of receipt and deleted as required. An Ad hoc line will not affect matching and settlement, and neither will it appear in integration files or reporting.
Insert Ad hoc Line
Additional receipt fields are displayed when an Ad hoc line is requested. These fields are hidden by default and invoked by a 'Show Ad hoc Line' button which displays a new line immediately beneath the last line in the Receipt Detail table. The format of the new fields is similar to a standard receipt row, for easy data entry.
For each Ad hoc row, the following text fields are available for manual entry or selection:
- Item Number (mandatory)
- Manufacturer Part Number
- Manufacturer
- Item Description (mandatory)
- Quantity Received (mandatory)
- Item Location
- Item State (mandatory)
When all details are entered, the Ad hoc line is inserted by clicking the 'Insert Ad hoc Line' button. Multiple lines may be added and new incremental line numbers are assigned to each, prefixed by 'A'.
Once inserted, line level Comments and Attachments can be entered and the line may be edited or deleted by selecting the appropriate Action icon. The Ad hoc line will not be saved until the Update Receipt button is clicked.
All Ad hoc lines will appear as a row in the Prior Receipts section of the Receipt Entry screen and the Receipt Detail screen, for the receipt transaction for which they are added.
Lines will not be permanently added as a PO line or be saved to appear in subsequent receipts for the same PO.
Edit Ad hoc Line
All users with receipt access will see Ad hoc lines displayed in the Line Detail section of the Receipt Detail screen. For users with the Edit Receipts user role, it is possible to fully edit or delete an additional Ad hoc line from the line detail section in the Edit Receipt screen. If the receipt is in approval it will be locked from editing and therefore Ad hoc lines cannot be deleted.
12.4.7 Save New Receipt
To save the receipt click on the ‘Save New Receipt’ button. The system will validate that mandatory information is entered (delivery note number, date received and a quantity) and the receipt date is not in the future.
PECOS P2P will display a ‘Receipt Saved’ message at the top of the screen to confirm that the receipt has been saved.
If you would like to return to the receipt later and not update the order, click on the ‘Cancel’ button to return to the previous screen. Your receipt will not be saved.